Depth of field will allow you to obtain a shot with the subject in focus and the background blurry. To obtain this look you will have to adjust your aperture setting. This is especially useful for portrait shots. It creates a more flattering image and draws your attention only on your subject. Also, the larger the aperture the more light it will let into your camera. Here is a website and a short clip that gives a basic understanding on apertures.
http://www.shortcourses.com/use/using1-9.html
Positioning of Subject
One of the easiest things you can do is position the subject you’re wanting to photograph as far away from any objects behind them as possible. If they are standing right in front of a wall you’ll probably end up with it in focus no matter what else you do - but if they’re standing 100 meters in front of that same wall it’s going to be a lot more blurry. Of course this will only get you so far - you’ll need to do some of what’s coming next as well.
Portrait Mode
Most DSLR cameras have a little wheel on top of it (on the left) with lots of little icons on it. One of those icons is a little head. This icon is the symbol for portrait mode and if you’re not confident with changing apertures (we’ll discuss this below) it’s a good mode to switch to as it will do some of the work for you. Portrait mode chooses a large aperture (a small ‘f’ number) which will make the depth of field (the amount of your shot in focus) smaller.
Aperture Priority Mode
Aperture Priority Mode is a great way to control depth of field as it will ensure your images are well exposed.
If you’re feeling a little more adventurous switch the wheel to ‘AV’ which is Aperture Priority Mode. This mode lets you choose the Aperture (the size of the hole in your lens) and tells the camera to choose all the other settings. This semi-auto mode is a great way to control depth of field as it will ensure your images are well exposed. For shallow depth of field and nice blurry backgrounds choose a large Aperture (the smaller the number the larger the aperture). Try taking a few shots at different apertures and see how it affects the background of your shots - this is the best way to learn how to get more creative control in your shots.
If you have a DSLR camera, I would recommend getting a 50mm lens. This lens is great for portraits. They range from $50-$100 which is probably one of the cheapest lenses you could invest in. This lens will allow you to get a very large aperture. Depending on which one you buy, it will give you a 1.8 or even a 1.3 aperture setting. This will really allow you to blur your background to make a nice flattering portrait. Another great use from this lens, is it will allow you to shoot in lower light situations without needing a flash.
Here is an example of using a large aperture. I shot this picture at a f/4.0 which created a nice blurry background and allowed me to keep only the flower in focus.
Friday, May 16, 2008
Depth of Field - Apertures
Saturday, May 3, 2008
What Kind of Equipment Do You Need?
The answer to this depends on what you want to do. If you want to keep a camera handy at all times to capture your kids and family events spontaneously, than you may want to get a simple digital compact camera. Here are some reasons for that:
- You can easily keep it in your pocket or purse.
- It is easy and quick to use.
- You are more likely to take pictures because you won't have to deal with the hassle of a bunch of equipment.
- You can change the lenses for different effects.
- You have more control over your lighting.
- Usually the quality of pictures are better.
First Lesson
What Time is it?
Below is a link that talks about what is the best light to use.
http://mamarazzischool.blogspot.com/2008/02/fun-photo-tip-what-time-is-it.html
The picture below was taken in the last hour of sunlight. Notice the warmth and even light in the picture. 
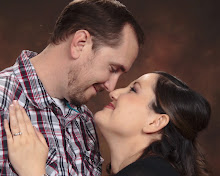
When I took the picture below it was right in the middle of the day when the sun is at it's highest. Because she was in the shadow, it created a nice even light on her face.
Another thing to remember is if you find your self in a situation where you don't have any shade, you can always use an external flash to get rid of the shadows in the subjects face. I would recommend getting a diffuser to put over the flash. Usually flashes are pretty intense and you don't want to wash out your subject. If you don't want to buy a diffuser, you can always use a cheap alternate method. You can always try using white tissue paper or some kind of opaque tape across the flash on your compact camera. Get creative, I am sure there are many more ideas out there you can use.