For those of you Photoshop users out there, here is a cool tutorial I came across. It may be a bit complicated for new Photoshop users, but it doesn't hurt to try. Here is the first part of the tutorial:
http://www.tuaw.com/2008/10/07/how-to-use-photoshops-lens-blur-tool-for-tilt-shift-fakery-par/
Here is the second part of the tutorial:
http://www.tuaw.com/2008/10/08/how-to-use-photoshops-lens-blur-tool-with-masking-part-2-of-2/
Tuesday, October 21, 2008
Photoshop Lens Blur Tool
Tuesday, September 9, 2008
Ambient Lighting
Ambient Light refers to any light in a given scene that isn’t artificial light, light supplied by the photographer. Sunlight, candlelight or light emanating from surrounding lamps can produce ambient light in a photograph.
Ambient lighting has become something I am a little obsessed with lately. I am actually in love with it! I was a second shooter for a wedding a couple of weeks ago and Melissa (who has been an amazing mentor to me with photography) showed me the proper way to do ambient lighting. Ever since than I have been practicing with it and trying new things. It is so much fun! I found a little website that goes more into how to capture the ambient lighting. This one uses Christmas lights as examples, but in general you could use any other kind of lights you want. You could even do a shot of Down Town with all the pretty lights flickering. In a couple of days I will be going to Universal Studios and touring Hollywood with my husband for our 5 year anniversary. (I am actually just really excited to take pictures!) I plan on taking some fun ambient lighting pictures in Hollywood in the in between stages of light and dark. I am so excited to see what I come up with! Here is the link to the website that shows how to capture this style onto the camera:
http://strobist.blogspot.com/2006/12/how-to-photograph-christmas-lights.html
Also you do not need a high end camera for this. A point and shoot will work as well. Just remember to turn off that flash. Here is a video if you would like a more detail description of everything:
Here are a couple websites about Night Photography.
http://www.webphotoschool.com/all_lessons/free_lessons/Creative_Techniques_for_Night_Photography/index.html
http://photojojo.com/content/photojojo-original/night-portrait-photography/
And last but not least, here are some of my own ambient lighting pictures. Some of these were done in doors just using the available light.


More pictures to come... once I get them uploaded.
Sunday, August 3, 2008
70 Beauty Retouching Photoshop Tutorials
For anyone who has Photoshop, this website will be very beneficial to you. There are some great tutorials in here. Enjoy! I know I will too!
http://www.smashingmagazine.com/2008/07/15/70-beauty-retouching-photoshop-tutorials/
Photography Composition 101
I think this post may help a lot with taking more interesting pictures. Here are a few tips when setting up a shot.
The Rule of Thirds
The Rule of Thirds is based on the fact that the human eye is naturally drawn to a point about two-thirds up a page. Crop your photo so that the main subjects are located around one of the intersection points rather than in the center of the image. Below is a site that goes into this theory more with some examples.
http://digital-photography-school.com/blog/rule-of-thirds/
Filling the frame
if you want to improve your photographs 100 percent, move closer. The one sure way to keep from including "too much" in a photograph is to fill the frame with your subject and nothing but your subject. Filling the frame from edge to edge leaves little doubt about what your intended target was. There are two ways to get closer: Use a telephoto lens or move closer. Here is a site I came across that included some great information on this topic.
http://digital-photography-school.com/blog/fill-your-frame/
Patterns
Patterns, both natural and man-made, bring a sense of visual rhythm to a photograph. Patterns appear whenever strong graphic elements—lines, colors, shapes, or forms—repeat themselves.
Once you do become aware of the power of patterns, you will discover them almost everywhere. For example, a field of flowers or in a garden like the picture above. The secret to finding patterns is to explore potential subjects from a variety of angles.
Below is a link to more information on composition. I included a couple tips that I thought were important above, but if you would like to read more on it please visit this site. I personally think composition is the key factor in making a good picture. If you can master this, you will be able to take your photography to the next level.
http://digital-photography-school.com/blog/digital-photography-composition-tips/
Saturday, July 26, 2008
Beach Photography

So of course we have to have a beach photography post since most of us live in San Diego. I did some searching the other day and came across this article. I found it to be most helpful in this subject.
Beach pictures could be the most common images captured by photographers. Beaches set the scene for family vacations, weddings and intimate getaways. There is a reason beaches are so widely photographed. They are beautiful... But there are many common mistakes made in beach photography. This article will help you take great beach pictures that are creative and impressive.
Have you noticed all beach pictures look the same? There's the standard sunset shot, or the posed family members with shadows blacking out their faces? Here are some tips to avoid some of those beach photography pitfalls.
First of all, look all around you. Look down, look up. Are there unique details or small items you can capture? You could spend hours simply on macro beach photography, capturing seashells, crabs or small toys on the beach.
There is one mistake quite commonly made when photographing the beach: putting the horizon line dead center. While it might make sense, as it is symmetrical, it violates the photography rule of thirds. You should always be aware of lines when shooting beach pictures.
The rule of thirds
Take a look at your previous beach photos. Is there a horizon line in the middle? How does it look to you? This actually slices the photo in half for observers.
Instead, stick to the rule of thirds. This means you should place the horizon in the bottom or top third of the beach picture instead.
Frame your beach picture
No, this isn't about the frame you buy later... This is about giving an anchor to your image. Look for natural frames for beach photos, such as a rocky outcropping or a leaning palm tree. You are looking for something that naturally places a frame around the target of your picture, the beach.
Before you shoot, really examine all areas of the image. Is there something distracting or ugly in your shot that you didn't intend to capture? Cars, electrical lines, a stray sunbather...
Also be sure your horizon line is straight. Sometimes, especially if an element in the foreground distracts you, you can end up with a lopsided beach.
Don't just shoot the beach. I mean, how is that different than all your other beach pictures? Instead, look for interesting items to serve as a focal point with the beach as the backdrop.
Look for Unique Still-Life Images
Check the area for an interesting focal point. Perhaps it is a lone and empty beach chair, or a bottle of greasy, sandy suntan lotion, or maybe even a surfboard propped against a palm tree. Place this item in the foreground, and keep the beach scene in the background.
The sun and its impact
We've all seen beach pictures gone bad, with the subjects (usually family and friends) partially or completely obscured by shadows and bright backlighting.
Sometimes you want this, say if you're shooting a couple hand-in-hand at sunset. Many times, you don't. Be sure you have the sun behind you, the photographer, not the people or things you are shooting at the beach.
A slightly overcast day can actually be better than a sunny day, and morning and afternoon have better lighting than midday with the long shadows from an overhead sun.
You don't always have to point your camera straight ahead, or directly at the beach. Look for unique and interesting angles for your beach pictures.
It's all in the perspective
What if you get down on eye level with your baby playing in the sand? You could stand straight above a crawling crab, or point straight up to the swaying branches of a palm tree.
Look for unique and unusual angles and perspectives for your beach pictures.
Splashes of color
Since beaches often feature rather bland colors, like shades of sand and driftwood, also keep an eye out for interesting splashes of color. A bright red beach umbrella, green palm leaf or hot pink sandals can really add something to your beach pictures.
Positioning for beach portraits
Place your subject or subjects to one side, with the beach shoreline filling the rest of the frame. This will allow the person to pop out from the picture, while still providing a lovely setting for a portrait.
Get up close
You are shooting something big: the beach. But remember who your subject is: the person or people. They should dominate the photo, not be a blurry, tiny image lost in the frame.
Get up close to the person you are shooting so that they fill about a third of the frame.
Catch the action
Not all portraits need to be posed. Look for candid picture possibilities. Instead of people squinting or scowling in the picture, catch them splashing or chatting or playing with sand and a bucket.
This is a wonderful way to catch memories and moments, not just cheesy poses.
The information from this article was found at http://cameras.about.com/od/cameratips/ss/beachpictures.htm
The first picture on this post, and the pictures below are some of my own example shots that include some of these tips. For those of you who don't own a high end DSLR camera, this is a perfect example of what I have said before. It is not the camera that always makes the shot! The following pictures are all from my point and shoot camera. These were all taken in Puerto Penasco, Mexico last year during my Thanksgiving vacation. I highly recommend Puerto Penasco by the way. October/November is the perfect time to go. The weather is about 80-90 degrees and the water is in the mid to high 70's. It is just perfect! OK I will stop, now I sound like a commercial! :o) Although with all the violence in Mexico right now, I am not sure anywhere down there is safe... Anyways here are a couple of the pictures:

Wednesday, July 9, 2008
Diffused Window Lighting
Today I wanted to play around with window lighting. I really love this effect since it creates a nice soft diffused light over the subject you want to take a picture of. I went to Yardage Town after work today and bought some sheer white material. Which came out to be around $5 or $6, not bad... When I got home I hung up my sheer material on my living room window. After that I needed a subject. Since no one was home I had to improvise... I used my shoes-Which served as a dual purpose. I have been meaning to practice taking pictures of shoes to get a more creative mind when shooting them. Usually this is something brides like to have a picture of when they get married. So in order to do this I pulled out my T.V. Tray stand so I could put my shoes on it. After hanging the sheer material on my window, I used the left overs to drape over the stand. Once I did this I noticed that wood shows through sheer material! Duh! I had to get creative... So I grabbed my white fleece robe and draped it over my T.V. tray stand. If you can picture all of this, it really looked quite ghetto! But hey, if it works who cares right? So after creating my "ghetto studio" I arranged my shoes in different positions while shooting in different modes and using different settings. It is funny how one little setting can change a picture. Here are my end results:


In all these shots I am only using the natural light from my window, along with material to diffuse it. To get this shot, I had to play with the exposure a little bit. If your exposure is too low, you will get a very dark subject with a bright background. Now if you are trying to get a silhouette shot, than this would be good. If not, bump up the exposure until you get what you want. In my "3 Mistakes Photographers Can Make" post I covered a little bit on this subject, but I wanted to go into more detail about it with this post. Hope it helps!
Saturday, July 5, 2008
4th of July Fireworks Slide Show
Here is a slide show of the photographs I took of the 4th of July Firework show in Santee. I really wanted to go down to Seaport Village/Midway/downtown area and take some cool shots there with some landmarks in the picture, but the news said it was going to be overcast down there. I think these photographs would have been stronger if there were some landmarks in the picture. Maybe the sky line of San Diego or that huge statue by the midway that has the sailor kissing his significant other. Oh well... maybe next year. I was still happy with my end result though. If you guys were able to read my blog in time or had the chance to take some firework shots, please share. I would love to see what you guys came up with too!
Thursday, July 3, 2008
4th of July - How to Photograph Fireworks
So bear with me, this is something I have never done before and I am so excited to try it tomorrow night. This is kind of last minute and depending on your equipment you may or may not be able to pull it off. Plus photographing fire works is a little tricky. But hey, who doesn't love a good challenge. After tomorrow night, I will post a couple pictures that I shot during the fire work show. For now, here is the research I have found to get a great fire work shot.
Use a Tripod - This is a must! Exposure times can be up to 1 to 4 seconds, so unless you want your pictures to look like a bowl of spaghetti bring it. Also, if you own a cable release or some sort of electric release, use it.
Location, Location, Location - Get there early if you can and pick a spot that will have an unconstructive view. Watch for trees, buildings and people that may get in your way. Hilltops, lakes or riverbanks offer a good vantage point. Also a nice touch is if you can incorporate a city skyline, monument building or reflections on the water.
Settings – First set your camera to its highest image quality setting, RAW would be best. Read your manual to find out how to set your image quality to RAW. Adjust your camera to the bulb mode setting. (This can only be done on a manual camera.) When using Bulb shutter speed, you are manually holding the shutter open. If your finger is on the camera's button, this will create camera shake. Even on a tripod. You will have to use a cable release to use the bulb shutter speed. If your camera does not have a bulb setting, then set it to aperture priority or the automatic setting. Set your aperture to f8 and your ISO to 100 or 200; any faster you may experience digital noise. ISO basically means your film speed. The brighter it is out side, the lower the ISO you want to use. The darker it is outside, you will want to use a higher ISO. Keep in mind that the higher the ISO you use, the more grain you will get in your pictures. Anything over 800 will give you more graininess. Now with that said, using a high ISO is not good for fire work shots. Why you ask? Even though it will be dark outside, the fire work itself will be VERY bright. So in turn you will want to use an ISO of about 100-200. So that is the exception. And don't forget... turn off your flash. Using a flash will capture or freeze the moment, but your flash will be like a 'drop in the ocean' trying to light up the sky. Setting up your digital camera for long exposure shots will capture all the colorful trails of the fireworks.
Focus – Set your normal lens (50mm) or wide-angle lens to infinity. If your camera does not allow you to do this then focus on the furthest light source you can.
Picture Time - Another thing to remember, is keep the camera very steady when taking the picture. To do this you MUST use a tri pod. Than after that, you have two options. You can use the 2 second self-timer to take the picture-the only bad thing is that you will need to have good anticipation and timing if you use the self-timer. Or you can use a cable release with the bulb shutter method. You will have more control over the timing of the picture this way. You can release your shutter as you see the firework steaming up to the sky and release at the pinnacle of the explosion or as the fireworks descend to the earth. This process should take 1 to 4 seconds on average. Experiment with it to get different results.****Personally I used the self timer option because I couldn't get my hands on a cable release in time. But that is ok, because the self timer worked out just fine.****
Don’t forget – Make sure your bring extra batteries, memory cards and a flashlight. And last but not least, why not capture the emotion taken from people's reactions ... snap the wonder shown on their faces as the next firework booms into the sky ... Happy 4th of July everyone!
******Here is the grand finale from the firework show I shot.******
After I took these pictures I came across this tutorial for fire work shots. I found it pretty helpful as well. Good to have for next year!
http://www.webphotoschool.com/all_lessons/free_lessons/Shooting_Fireworks_with_the_E-3/index.html
Wednesday, June 18, 2008
3 Mistakes Photographers Can Make
Number One:
Not getting close enough to the subject. Try not to stand too far away from what you are photographing. You want to make your subject the main focus. How close should you be? Close enough for the subject to fill the frame. If you are photographing a house, let the house fill the frame. If you are photographing a child, let the child fill the frame. Be constantly aware of what's in the picture and what's out of the picture. If a chair is important to you than include the chair, but if it's really the child that is important to you then loose the chair. The easiest way to do that is get closer. Also, don't be afraid to crop some of the subjects face too. It will make for an interesting photo. Below is an example of one: 
Number Two:
Not shooting enough. Take lots and lots of pictures until your finger hurts from pressing that button. It is all digital these days. Can't get cheaper than that, no more buying film. The more pictures you take of a subject, the better your chances are of getting something really different. Try different angles too. Whether you get up high or down low, this will help get a different perspective on the subject. Another bonus is you can learn from your mistakes by taking lots of pictures. Get to know your camera and try different things. With digital technology, you can get instant results and know right away the things you need to change on the next shot.
Number Three:
Not considering the quality of light in a picture. I still struggle with this and practicing is the only way to overcome it. The pro's secret for getting great portrait light indoors is using natural light. This is such a wonderful light that many pros insist on using nothing but natural light for their portraits. So turn off your flash. Read your camera manual to learn how to do this. An electronic flash produces a consistent amount of light that comes from a consistent location (the camera,) with that said, it produces consistent results. The problem with this is the light is consistently harsh, flat, and a mood destroyer. It fills shadows that would otherwise add depth and drama to an image. With consistency, there is safety which means predictable, safe results. The light that comes from your built in flash, is the same lighting effect you see when you're sitting in your car on a dark night and your headlights blast someone in the face. Not pretty... Below are some other alternatives you can try:
Window Lighting:
This light is so flattering on a subject. The most ideal window light is a north facing window, but any window, getting nice soft non-direct sunlight will work. If the window is dirty, that is even better because it will help diffuse some of the light and make it softer. If the only window you have gets direct sunlight try using a sheer curtain to diffuse the light on the subject's face. If you don't have any sheer curtains try going to Walmart or Target and buy two things. A frosted white shower curtain (or a shower curtain liner,) and some tacks or push pins. With the tacks or push pins you are able to hang up your shower curtain. You can also bump up the exposure to blow out the background and give a bright white effect behind them. Try different things with this technique. You can place them close to the window, far away, use or don't use a sheer curtain. You will get different effects every time. Be creative and have fun!
The doorway:
Place your subject inside the doorway. This provides a shade for your subject so you won't encounter harsh lighting from the sun. Plus the lighting is great in this area. If you don't like your background, you can always drape something behind your subject to hide the background. Or you can use a large aperture to blur out the background.
The Garage:
Great light comes to the most unexpected places. Believe it or not, when the sun hits the driveway outside the garage door, lots of the light we're looking for flows inside. Position your subject as close to the garage door opening as possible. I actually stumbled upon this great light effect. I was in my Dad's garage taking pictures of some of the things he loved... his tools and his classic Pontiac car. While I was taking pictures, I noticed the great lighting I had in there. Here is a shot that I loved the lighting in:
The Porch:
Porches let in so much light and they are big enough to fit a big group of people. You will want to wait until it is a sunny day when the area around the porch-the grass and trees-is bright with direct sunlight.
For those of us that live in an apartment and may not have a porch or even a garage there is still hope.
The best time to take pictures by an apartment window is when the building across the street is being hit by direct sunlight. Therefore your building that you live in is receiving the reflected light.
Now don't get me wrong, I am not against flash photography, but natural light is always best to use if you can. There are times that you have to use a flash. If you do need to use a flash I would recommend buying LumiQuest's Soft Screen Diffuser. Mind you this is only for pop up built in flashes. The best part is it will only cost you around $13 plus shipping. Here is the website for it:
http://www.lumiquest.com/softscreen.htm
Now for those of you that have external flashes, there are a lot more options for you. On LumiQuest's website there are a bunch of options you can choose from to help diffuse that light. I recently bought the Promax System, and it has proven to be quite useful so far. If you don't have any accessories like this than I would just use the good ole' bouncing flash technique. All you do is aim your external flash towards the ceiling and let the light fall on your subject. This creates a very even light around your subject. Make sure your ceiling is white and it is not higher than 10 feet. If it is, this is where the attachments from LumiQuest come in handy. The picture on the left is a photo that was blown out by the direct flash. The picture on the right was created by bouncing the flash; Therefore it created an even lighting over the couple and the background. 

Friday, May 16, 2008
Depth of Field - Apertures
Depth of field will allow you to obtain a shot with the subject in focus and the background blurry. To obtain this look you will have to adjust your aperture setting. This is especially useful for portrait shots. It creates a more flattering image and draws your attention only on your subject. Also, the larger the aperture the more light it will let into your camera. Here is a website and a short clip that gives a basic understanding on apertures.
http://www.shortcourses.com/use/using1-9.html
Positioning of Subject
One of the easiest things you can do is position the subject you’re wanting to photograph as far away from any objects behind them as possible. If they are standing right in front of a wall you’ll probably end up with it in focus no matter what else you do - but if they’re standing 100 meters in front of that same wall it’s going to be a lot more blurry. Of course this will only get you so far - you’ll need to do some of what’s coming next as well.
Portrait Mode
Most DSLR cameras have a little wheel on top of it (on the left) with lots of little icons on it. One of those icons is a little head. This icon is the symbol for portrait mode and if you’re not confident with changing apertures (we’ll discuss this below) it’s a good mode to switch to as it will do some of the work for you. Portrait mode chooses a large aperture (a small ‘f’ number) which will make the depth of field (the amount of your shot in focus) smaller.
Aperture Priority Mode
Aperture Priority Mode is a great way to control depth of field as it will ensure your images are well exposed.
If you’re feeling a little more adventurous switch the wheel to ‘AV’ which is Aperture Priority Mode. This mode lets you choose the Aperture (the size of the hole in your lens) and tells the camera to choose all the other settings. This semi-auto mode is a great way to control depth of field as it will ensure your images are well exposed. For shallow depth of field and nice blurry backgrounds choose a large Aperture (the smaller the number the larger the aperture). Try taking a few shots at different apertures and see how it affects the background of your shots - this is the best way to learn how to get more creative control in your shots.
If you have a DSLR camera, I would recommend getting a 50mm lens. This lens is great for portraits. They range from $50-$100 which is probably one of the cheapest lenses you could invest in. This lens will allow you to get a very large aperture. Depending on which one you buy, it will give you a 1.8 or even a 1.3 aperture setting. This will really allow you to blur your background to make a nice flattering portrait. Another great use from this lens, is it will allow you to shoot in lower light situations without needing a flash.
Here is an example of using a large aperture. I shot this picture at a f/4.0 which created a nice blurry background and allowed me to keep only the flower in focus.
Saturday, May 3, 2008
What Kind of Equipment Do You Need?
The answer to this depends on what you want to do. If you want to keep a camera handy at all times to capture your kids and family events spontaneously, than you may want to get a simple digital compact camera. Here are some reasons for that:
- You can easily keep it in your pocket or purse.
- It is easy and quick to use.
- You are more likely to take pictures because you won't have to deal with the hassle of a bunch of equipment.
- You can change the lenses for different effects.
- You have more control over your lighting.
- Usually the quality of pictures are better.
First Lesson
What Time is it?
Below is a link that talks about what is the best light to use.
http://mamarazzischool.blogspot.com/2008/02/fun-photo-tip-what-time-is-it.html
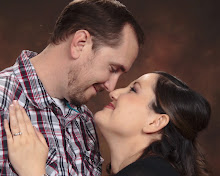
The picture below was taken in the last hour of sunlight. Notice the warmth and even light in the picture. 
When I took the picture below it was right in the middle of the day when the sun is at it's highest. Because she was in the shadow, it created a nice even light on her face.
Another thing to remember is if you find your self in a situation where you don't have any shade, you can always use an external flash to get rid of the shadows in the subjects face. I would recommend getting a diffuser to put over the flash. Usually flashes are pretty intense and you don't want to wash out your subject. If you don't want to buy a diffuser, you can always use a cheap alternate method. You can always try using white tissue paper or some kind of opaque tape across the flash on your compact camera. Get creative, I am sure there are many more ideas out there you can use.
Subscribe to:
Posts (Atom)